Perfect Orange Cake!

Gâteau à l’orange or The French know their cake:

Years ago my mother gave me this cook book. It’s a first edition from 1950 of French recipes by Mme. Germaine Carter. Of interest for the story of how it was compiled as for the recipes themselves; Mme. Carter, her husband (the British consul at Boulogne) and Mr. Rapp (British ambassador to Mexico) were interned together in Brandenburg during WWII and passed much of the time discussing French cooking and compiling this book.

Easy and delicious:

Although there are many things in this book that I will probably never make – say, Calf’s Brains with Cream Sauce or  Lark Pâté – I have found that the recipe for mayonnaise is stupendous and, like the two cake recipes I use again and again, easy to follow with reliable results. First take a look:

 Mme. Germaine Carter’s Gâteau à l’orange

Looks good, yes! Here’s the recipe:

4 eggs beaten
2 cups sugar
3/4 cups milk
3 cups sifted flour
4-1/2 tsp. baking powder
1 tsp. salt
grated peel of 2 oranges
juice of 1 orange**
1 cup butter

Beat the eggs wit the sugar; add a little milk. Sift the flour wit the baking powder and salt. Add milk and flour alternately, beating well. Add the orange peel and juice of 1 orange then the butter. Beat well and pour into 2 greased loaf pans. Bake in a moderate oven (350ºF / 180ºC) for 40 min. Remove from the pan to a cooling rack.

It is in fact, as easy as it sounds. My only modifications have been to bake the whole shebang in a large sheet cake pan and to check it after 35 min. She follows this recipe with another for ‘orange syrup’ which uses the juice of the second orange, another cup of sugar and a 1/2 cup of water; however, I’ve only done that once. The cake is quite ‘orangey’ enough without and my whole family loves it ‘as is’ with no icing or with sweetened whipped cream and fresh strawberries as in the photo. It does make a lot of cake so it’s perfect for a party, the layer cake you see in the picture is what I made with the 1/3 that was left over the second day after the other 2/3’s had been devoured ;).

Hope that you all enjoy Mme. Carter’s Gâteau à l’orange as much as we do.

**This is one recipe in which those beautiful Italian ‘blood’ oranges are not recommended unless you want your cake to turn a bluish-grey! The beautiful hot pink juice of these oranges is Ph reactive and will  change color when it combines with the baking powder
Summer Grain Salad

A great alternative to pasta salad for summer – serves 2 as a meal or 4 as a side dish. The trick is in the dressing; the balance of vegetables can be suited to your palate and what is fresh in your area. Nice additions are pitted nicoise olives, fresh corn, or even cucumber. If you want a non-vegan version some cubed, crumbled, or shaved cheese (aged parmesean always good but ricotta salata or even feta or peccorino will work – avoid soft cheeses).

1/8 cup pearlized spelt
1/8 cup pearlized barley
1/8 cup black (or red or wild) rice
1/8 cup brown rice
1 cup + a little liquid
1/2 cube of low-salt, vegetable bullion
1/4 cup diced cherry tomato
1/4 cup diced yellow bell pepper
1/4 cup diced carrot
1/4 cup diced zuccini

3-4 cups Arugula or Baby Spinach

toasted pumpkin seeds or pine nuts (optional)

Dressing: mix together in a glass dish beating vigorously with a fork as you pour it over the salad to keep everything evenly distributed.

2/3 cup olive oil (this is salad so use the good stuff)
1/3 cup made up from 1 part lime juice, 1 part red-wine or apple cider vinegar, 1 part balsamic vinegar
2 tsp. finely grated fresh ginger
2 tsp. finely grated fresh garlic
1 tsp. soy sauce
1/2 tsp. crushed dried mint or 2 tsp. fresh mint finely minced

Cook mixed grains according to cooking times for each (adding the faster cooking grains to the pot as you go). I start with the black rice, add the brown rice then the spelt and then the barley. About half way through the cooking time lower the heat and cover the grain.  Feel free to stop and taste the grain to see how it’s coming along but don’t stir. If it starts to get dry before it’s done, add some very hot water from the tap (a little at the time). While the grains are cooking dice the vegetables and prepare the dressing. Towards the end of the cooking (about 5 min. before it finishes) add the carrot and the zucchini to the top of the grain so that it is (very lightly) steamed.
Combine cooked grains, carrot, and zucchini with tomatoes and bell pepper. Mix dressing into warm grain. It can be eaten right away or allow to cool and then refrigerate for a cold salad.
To serve: divide greens evenly into dishes. Top with salad. Garnish with toasted pumpkin seeds.
Guaranteed to make you feel full and energized without feeling stuffed. Enjoy :-).

The verdict on buckwheat shortbread is in…

If you read my last post you might be interested to know how they came out. So, here they are, dusted with powdered sugar and on the cooling rack…the family verdict:

WOW! These are really good, what’s in them?

And that’s from a man who spreads butter AND nutella on his Pan d’oro and a 5 year old girl who tells me that the meatballs needed just a little more salt and that she wants her basalmic vinegar next to but not on the cheese. To me the texture was pleasingly like a ‘sandy’, both light and tender.

So, if you were feeling a bit gun-shy of trying a ‘healthy’ cookie made with whole-wheat and buckwheat flour, jump right in and give them a try, they’re easy to make and delicious!

A Saracen grain cake was in her mouth…adventures in cooking with buckwheat

 Several weeks ago I was at the Italian version of Whole Foods Market (only much smaller). I was getting some nice organic flour for my bread making and on the aisle on the way to the register I ran across a package of ‘mixed seeds’ on sale, it had pumpkin, sesame and sunflower in there (some of my favorites) and then ‘grano saraceno tostato’. Thinking the Italian version of ‘hmmm, well, what d’ya know?’ which is the much shorter ‘boh.’ – I plopped the little package into my basket and went on with my day.
Of course when I offered some to my curious 5 year old daughter – “Hey, want some of these seeds on your yogurt?”, her inevitable question: “What kind of seeds?!?” was not to be fobbed off with a quick, “Lots of different ones.” So, I had to lay one of each kind out on the table in a row from smallest to largest, and give them their appropriate names in English and Italian:

semi di sesamo = sesame seed
semi di lino = flax seed
grano saraceno tostato = boh, I don’t know, toasted Saracen grain?
semi di girasole = sunflower seed
semi di zucca
= pumpkin seed

And of course mamma’s “I don’t know” was pounced on.
Robin Kay: “What’s Saracen grain?”
Mamma: “It must be these little triangular ones that are so crunchy.”
Robin Kay: “But is it called that in English?”
Mamma: “I don’t think so, but I don’t know exactly what it’s called in English…let’s look it up”

On behalf of mamma’s the world over, I offer my profound thanks to Wikipedia! I found the entry in Italian and went down the language list to English and in a click there it was:

Mamma: “Oh look, it’s Buckwheat, like in Ol’ Suzanna (singing) ‘a buckwheat cake was in her mouth, a tear was in her eye…”
Robin Kay: “What’s a buckwheat cake? Can you sing the rest of the song?”
Mamma: sigh…

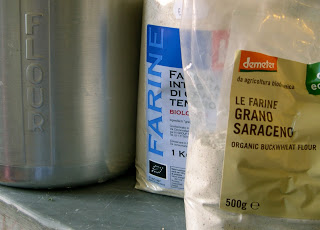
Needless to say the next time I went to the store I bought some buckwheat flour and I’ve been experimenting with using it in bread. Today, because I don’t feel like making something as complex as a cake, I found a recipe for a buckwheat shortbread cookie on the L.A. times website.  I made only a few changes based on what I had in the pantry and what I didn’t: I used wholewheat flour rather than white for the 1/2 cup of ‘not-buckwheat flour’, I used brown (turbinado/demerara) sugar and, for lack of walnuts or almonds, I toasted a mix of pine nuts, oatmeal and flax seeds which I then went over a few times with the mezzaluna…

Yes, I know, it looks like a log of compressed wood; buckwheat flour is, well, gray. The dough has to be rolled up and put in the fridge for a few hours before slicing and baking so I’m hoping that, with a dusting of powdered sugar, the finished ‘Saracen grain cakes’ will look as good as they promise to taste (the the bit of dough that stuck to the bowl was delicious!). We’ll let you know how they come out…

Olive oil from Sicily: a mouth full of flowers and memories.

A summer long, long ago on an island not so far away my husband and I were working with a friend to renovate a house just outside of the town of Marsala in Sicily. The client put us up in an apartment nearby and provided us with olive oil in 5 litre jugs. There was a grove of orange and lemon trees on the property and open-air market two days a week. I would ride there on a borrowed bike with an orange crate wired to the back to carry the produce. Much to the dismay of our friend I did so in a skirt; he said that would attract the wrong kind of attention while I felt it would somehow keep the erratically driven cars from crashing into my erratically piloted bicycle. As far as I’m concerned, my strategy paid off.

It was the end of June and cherries were in season. I bought them 5 kilo at a time; Matthew and I ate them on the roof of the apartment in the cool of the morning while looking out over the suburban rooftops and antennae, towards the sea where we imagined we might glimpse Tunisia.

It was gloriously hot and we ate lunches of melon with prosciutto crudo and sandwiches of fresh tomato and buffalo milk mozzarelle and basil grilled in the skillet. All of it with this olive oil that densely green, perfumed and which tasted like a mouth full of flowers.

We left Sicily in late July having visited Trapani and Palermo all too briefly; having watched Italy win the world cup on the television in a barber’s shop where complete strangers had invited us in to watch and then joined in the explosion of jubilation in the streets that followed. On the way back north, with us we carried 5 litres of olive oil, it didn’t last long enough.

Olive oil is to Italians (and some ex-pats) as chilli is to Texans: everyone has an opinion. Tuscan oil is best, but no, the stuff from Abbruzzo is just as good and less expensive; still, others prefer oil from Umbria or even as far north as Lago di Garda where a microclimate allows olives to survive the cold winters. I’m a solid fan of Sicilian Olive oil although I have to say that I’ve bought jars of olive oil from Trapani at the supermarket in hopes of recapturing that mouth full of flowers and found it light and bland. We’ve made due, enjoyed other lovely olive oils from other parts of Sicily, and lately had some nice oil from Lazio.

Matthew is working again with that same friend, this time designing a staircase for an apartment in Milan. He came home for the weekend of the Epiphany with this:

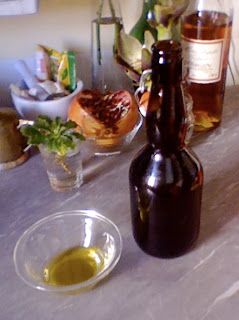
My mouth is singing flower songs. Orange blossoms tumble in with memories of rooftop cherries, summer swimming in crystaline, warm water and platters mounded high with fresh, steamed mussels. It’s hard to imagine a lovelier way to start the new year.

I wrote a suite of 4 poems about this experience, you can find some images and the audio HERE.

Warm food for cool weather!

@font-face { font-family: “Times New Roman”; }p.MsoNormal, li.MsoNormal, div.MsoNormal { margin: 0cm 0cm 0.0001pt; font-size: 12pt; font-family: “Times New Roman”; }table.MsoNormalTable { font-size: 10pt; font-family: “Times New Roman”; }div.Section1 { page: Section1; }

On our way back from our last trip to Rome we stopped in Pietra Santa and got snacks for the last leg of the trip north. I couldn’t resist. I bought two huge bunches of Cavolo Nero (Tuscan Black Cabbage). It’s the only kind of cabbage that my husband will eat and it makes a marvelous addition to any version of Tuscan white bean soup.

TUSCAN WHITE BEAN SOUP
Serves 2 for 3 days. Beans taste good refried in lard and wrapped in flour tortillas or spread on crunchy multigrain toast.
500 grams (appx. 1 pound) Cannellini beans
         (soaked overnight in water to cover)
120 grams (or appx. 1 cup) cubed Pancetta Affumicato
         or Apple Smoked Bacon 
(note: if you want to make this vegetarian, omit the bacon, sauté the vegetables in olive oil and then add 2 or 3 large pieces of Parmesan cheese rind when you add the water)
Minced but kept separate:
1 medium yellow onion
2 small shallots
2 ribs celery
2 medium carrots
Splash of white wine
5 cups water, vegetable or chicken broth
2 big sprigs fresh whole sage
4 big sprig fresh whole rosemary minced fine (2 tbs minced)
4 fresh (or 4 dried) bay laurel leaves
2 small sprigs fresh savory or 1 tsp. dried
4 cloves garlic smashed with the broad side of a knife
3 cups roughly chopped cavolo nero (Tuscan black cabbage) or Collard Greens
½ cup tomato sauce or on 12oz can of diced tomato
Extra virgin olive oil and Parmesan cheese as garnish
Fry pancetta or bacon in bottom of a large stockpot until browned, add minced onion and shallot, sauté until soft. Add carrot, sauté 2 min add celery and sauté until celery is soft and all of it has caramelized in the bottom of the pan, deglaze with a splash of white wine.
Add water or broth, herbs, and garlic together with drained beans to the stockpot atop the bacon and minced vegetables. Bring to a boil and then return to a low simmer for 1-1/2 hours adding water if necessary. When beans are almost tender add the leafy greens and cook for another 30 min and then add ½ cup tomato sauce or can of tomatoes and salt to taste.  Serve with a drizzle of olive oil and fresh grated Parmesan cheese.
Next up: an attempt to make casoulet a l’italienne with the leftovers!

Last taste of summer salad

  Here they are…the simplest of ingredients for a delicious ‘last taste of summer’ salad that has a fabulous combination of sweet-crunchy, and crumbly-salty:
to serve 2 for a light lunch or 4 for a side.

 ingredients:

  • one ‘pear williams’ they yellowish ones with red cheeks, not too soft
  • one small bulb of fennel, if you can’t find this I imagine that celeriac (celery root) would be a good replacement.
  • parmesan cheese (a chunk but nothing like as big as in the picture! maybe 1/3 cup)
  • extra virgin olive oil
  • basalmic vinegar
  • salt and crushed corriander seed (or powder) to taste

Okay, now slice the stuff and (gently) mix it up! It’s that easy. I use my mandolin slicer and it takes about 5 minutes but you can use a regular knife and cut it into medium or large dice and it’s good like that too. Then spoon two ‘salad’ spoons of olive oil over the salad and then fill the third spoon and rest it on top of the salad. Into this full spoon, drop 4-6 drops of basalmic vinegar into the oil, sprinkle it with  salt and coriander, mix inside the spoon with the a fork and finish dressing the salad.
Voila!

Pasta with onions, tuna, tomato and Taggiasche olives

I made this the other day because I started frying one little sliced onion in a dry skillet in preparation for making something else when the smell made me want more onion and the rest of it fell into place based on an Italian dish Matthew has made several times with onions and tuna. Sorry no picture!
(main dish for 2 – double for 4 abundant main serving portions)
200 g bow-tie, fusili, or spaghetti
2 small yellow onions
1 small can of tuna in olive oil (drained)
10 cherry tomatoes (those really sweet oblong ones are good)
1/8 cup pitted Taggiasche or Nicoise olives in oil (if only available in vinegar, rinse and drain)
1 TBS tomato paste
Salt to taste
Pasta water on to boil, two small yellow onions sliced thin and simmered over low heat first in dry (preferably large and cast iron) skillet and then add a bit of olive oil. Keep the onions simmering for about 10 minutes or until they’re transparent and golden, add one small can of tuna in olive oil (drain off oil first), then 10 cherry tomatoes quartered turn up heat slightly and saute a minute before adding 1/4 cup pitted Taggiasche or Nicoise olives. Turn heat way low, add a bit of salt if it needs it. Put the pasta in the briskly boiling salted water, don’t let it get mushy! Keep an eye on the ‘sauce’ you want the sugars in the onion and tomatoes to caramelize but not burn, if it looks right (golden-orange and a bit sticky) add the tomato paste and turn off the fire and remove it from the heat until the pasta is al dente. Ideally the pasta is ready just as the sauce turns carmellish, drain the pasta and toss into the skillet, crank up the heat and add a bit more oil if necessary to encourage the sauce to coat the pasta ;)! Good served with a cool, crisp green salad after to balance out the flavours. Nice with a semi-bubbly white wine, or a dry still one like Oriveto (secco).

New adventures in pesto…something summery

Sundried Tomato, Lemon Zest, Mint, Walnuts

There is a lot of fresh mint growing in the garden this year and the basil is a bit thin…we figured out what to do; this is the stuff! Matthew has been bugging me for about a week now to try a pesto of Sundried tomatoes, Lemon Zest and Mint. Little Robin is not so crazy about things with lemon peel (though she is happy to lick sliced lemons), so, we decided to try it today at lunch while she is enjoying her last few days of school food.

2 abundant servings or 4 side servings :

For the pesto:
1/4 cup sundried tomatoes in olive oil
2 Tbs. fresh mint
Grated Zest of one small lemon (appx. 1 scant lightly packed Tbs.)
Scant 1/4 cup walnuts, pecans or pinenuts (pinoli)
Extra Virgin olive oil

To make pasta salad:
160 grams – about 1/3 lb ( of pasta, cooked in boiling, salted water then drained and well-rinsed in cool water and drained again)
1/2 cup of whole milk ricotta, crumbled (use low-fat if you want but it’s just not the same!)

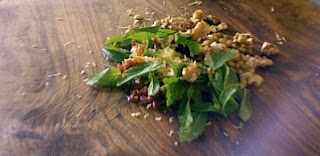
To make the pesto, put all the stuff in a pile (see picture), mince fine with a mezzaluna or chef’s knife. Take roughly chopped stuff and run through a small food-processor (or use an immersion blender) with additional olive oil (up to 1/2 cup but start with less – maybe a few tablespoons) turn it into a paste with the consistency of well…pesto ;)!

Place cooled pasta in a large bowl and coat with pesto. Add crumbled ricotta and stir in gently.

It should look something like this and taste wonderful!

Suggested wine: Oriveto classico (chilled) or light Beaujolais (chilled).

Happy eating!

An American Kitchen in Italy

I’ve been editing a series of cookbooks this week: appetizers, cupcakes, tappas, amuses-bouches…I’ve also been cooking because NOW is the time to get fresh produce in Italy. Honestly it’s always a good time but summer is when classic Italian veg is at it’s peak: tomatoes, aubergines (eggplant), zucchini, bell peppers. It’s all good.
There is another wonderful thing that I’ve discovered since I moved here and that’s veg prepared sott’olio. My favourite is melanzana (aubergine or eggplant). Conserving things (even cheeses) ‘under oil’ is an Italian tradition but I do the ones that stay in the fridge. I don’t have time for canning but a lovely lady from piedmont explained to me how she made her’s (which were delicious) and I worked out my own way to make them at home.

Prep and cooking: only about 30 min!
Ingredients:
2 small Eggplant sliced in rounds 1/4″ thick (before you blanch and stick your tongue out and screw up your face in disgust…they’re GOOD this way; I swear! If you you can’t tolerate the idea use zucchini, or even yellow ‘crookneck’ squash)
2 TBS chopped fresh herbs. I suggest the following combinations: Eggplant / sage; Zucchini / mint; Yellow squash / thyme. Feel free to experiment.
2 cups extra virgin olive oil (it’s alot but you can use what’s left in the dish for the next batch.
3 cloves garlic sliced paper thin (optional – if you don’t like garlic you can replace this with shallot or even sweet red onion)
1 tsp. basalmic or red-wine vinegar.
Salt

Okay, now it’s really easy: slice the veg. sliver the garlic. chop the herbs fine.

Heat a large cast iron skillet until it smokes. Before setting mine on the stove I rub it with 2 TBS seasalt and 1 tsp olive oil and then wipe all of that out with a paper towel. Don’t use stainless steel. Don’t use anything thin. If you’re stuck use a non-stick skillet. I repeat: DRY SKILLET!

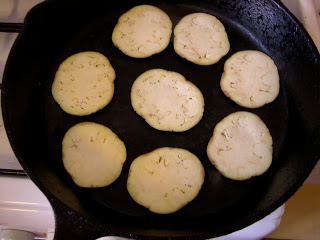
 Place the eggplant rounds (or zucchini strips or squash strips) in the skillet (don’t crowd) and let them toast. It will take awhile, they’re full of water (squash and zucchini will cook much faster!).
While you’re waiting, fill a flat, fairly small glass casserole or plastic dish with 1/3 of the oil, vinegar, herbs, and garlic or shallot. Wiggle the tines of a fork around in it to mix a bit and sprink with salt.

When the edges of the eggplant start to turn colour, turn them ;). They should look like the pic below, if they don’t turn them back and let them cook longer.

Let them continue cooking until the under sides look like the tops.

Now, take each slice out of the pan with a fork and set it down in the dish of oil wiggle it with the fork and then flip it over so that both sides are coated.
Arrange them in a fan as you work and squish them down with your fork.

Layer #1

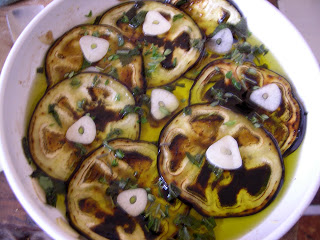
Add more slices to the pan and keep going like this, adding layers as you go along with oil, herbs, garlic and a few drops of vinegar as you go. Remember to coat both sides with the oil and keep pressing lightly with a fork. It should look something like this:

Layer #2 (the white things are garlic slices)

Finish the final layer with a bit more oil and a final sprink of herbs. Let cool on countertop. Cover with plasticwrap (clingfilm) and put in the fridge. You can eat them right away and they’re good, but they’re even better the next day (or the day after). They will keep for at least a week; in our house they never last that long! After resting they will look like this:

These tasty slices are DELICIOUS with soft or aged goat cheese (chevre), fresh mozzarella, feta, or shaved parmesan. Party plating would be to take a tablespoon of or strip of fresh mozzarella, roll-up in one of the eggplant slices, close with a half a cherry tomato and a toothpick. They are also good over a slice of toasted bread with thinly sliced tomato and chevre or mozzarella.